#1 How do I : Find out more information about the galaxy I have classified?
-
 by
Capella05
moderator
by
Capella05
moderator
We have all had that moment, where the object we are currently classifying takes our breath away... sigh... and it is only natural to want to find more information about 'my galaxy' - Hopefully this guide will give you the basics on how to use the tools that are available to you at Galaxy Zoo.
.
 Before I start one final important notice about classifying:

 Always classify the image directly at the center, and ***never*** try to avoid a really hard image.
 It does not matter if you can't make heads or tails out of it- just try your best.
 We will learn more from the jumbles of classifications than if it was never classified.
.
This guide is primarily geared towards newbies.
In future I hope to expand the series with the help of other mods / scientists and super users.
Back to business - I chose a image classified within the last 24 hrs, to use as an example...
This is AGZ0006ggq, posted by @kenkendall:
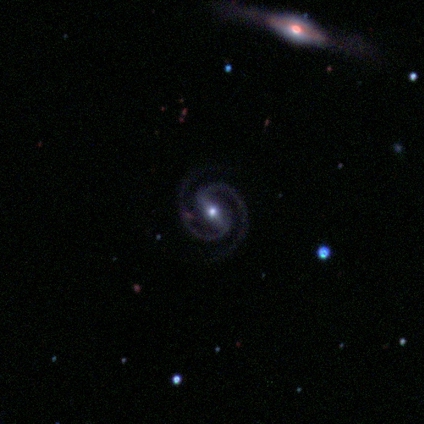
A gorgeous #barred #2_arm #spiral - more commonly know as a gorgeous barred, two armed, spiral galaxy 😄
So how do you find out more information on your own galaxy?
Posted
-
by
Capella05
moderator
Step 1:
When you have navigated to talk with your galaxy, click on the 'Galaxy Zoo Examine' hyperlink. See the highlighted bit below.

I have also highlighted the survey that the image is part of - infrared (UKIDSS) is very different to the SDSS / Hubble images we have classified before.
Posted
-
by
Capella05
moderator
Step 2:
You will then be presented with this screen - Decisions, Decisions....

You could view the image in different filters (but that is a subject of another #howto guide) or you could click on 'View on SkyServer'... I would go with clicking SkyServer in this case...
Posted
-
by
Capella05
moderator
Step 3: What does all this mean?

Ignore all the numbers, and just look at the image - looks different? Right? That is because we are now viewing the galaxy in the optical. Also, the image has been slightly rotated- flipped.
For the time being we are only interested in the object type, in this case it has been classified as a 'Galaxy'.
This particular object has also had a spectrograph (or 'Spectra' as we refer to it on the Zoo) taken, so we can learn a lot about the galaxy from the emission and absorption lines.
Lets us leave this screen for now, as we want to find out more information on this galaxy's neighbourhood. For that we need a wider view image.
Click on the image of your galaxy.
Posted
-
by
Capella05
moderator
Step 4: Where has my galaxy disappeared to?

Click on the 'Get Image' button on the left hand side. It is highlighted in the image above.
We will now be presented with this amazing image 😄

We call this the chart view, and we have limited functionality. Can you see the + and - signs on the left hand toolbar? Use these to zoom in and out of your image.
Also, try using the different drawing options. Can you get the image to invert? To get back to to the original image just untick the checkbox.
By now I am sure you have all noticed the gorgeous edge-on galaxy on the right and you are wondering how we can view that galaxy on SkyServer.
Well, we need to use the Navigate feature, Just below the DR8 logo there is a 'Navi' hyperlink - click on it! You may need to click on 'Get Image' once again...
Posted
-
by
Capella05
moderator
Step 5: Using Navigate

This screen looks quite a bit busier than the Chart view, but don't be intimidated by it! It is fairly simple to use 😃
The thick blue bars on the outline of the image can be used to move the image in the corresponding direction. We have the same drawing options on the left hand toolbar and we have a new toolbar on the right.
Firstly, move the green cursor from our spiral galaxy to the edge-on galaxy (as seen in the image above). You will notice the details in the selected object and quick view will now be updated to reflect the newly selected object.
Now using the toolbar on the right hand side - click on 'Explore'

We are now back to Step 3 but with all the information for the edge-on galaxy!
Posted
-
by
Capella05
moderator
Step 6: Does this galaxy have a name?
As a last step in this tutorial, let us see if we can find the name (or more correctly - the designation) of our edge-on galaxy. To do that we need to select 'NED Search' hyperlink on the left hand toolbar.

The first entry should be the object we are looking for, but it is always good to get into the habit of double checking the RA / Dec between NED and SkyServer - in this case they are the same, so it is the same object 😃
So there you have it - the designation of this galaxy is UGC 09839 😄
Posted
-
by
Capella05
moderator
Final Note:
I think it is really important to point out that SkyServer / NED and SINBAD are not always correct! I have seen stars classified as galaxies and visa versa. The best tool a citizen scientist has are their eyes, if you think that there is a mismatch of data between the various databases and what you are seeing, I would go with what you are seeing!
These tools are a nice add-on, but it is not necessary to use them to be a GalaxyZoo classifier.
Posted